
Inserting Landscape Pages to a Word 2003 Document
This tutorial is intended to show you how to insert landscape pages into a Microsoft Word document that contains portrait pages. This can be used to accomodate tables or images into your document that are too wide to be shown easily on a portrait page.
Changing the orientation of a page is not that difficult, but moving the page numbers so that they line up with the rest in your document, is more troublesome. The examples in this tutorial work with the page number placement guidelines for the University of Maryland Graduate School requirements for page number placement.
Figure 1
PART I: Orient the page to Landscape
- Go to the page you wish to make landscape. On this example, we will make page 2 landscape, while page 1 and page 3 remain portrait.
- Place the cursor on the last line of the previous page (page 1 in this example). Click Insert -> Break on the menu. Click Section Break - Next Pageand click Ok. (figure 2)
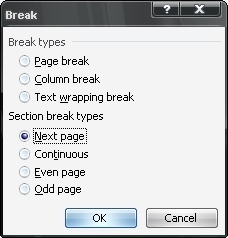
Figure 2
-
Click File -> Page Setup on the menu. Under the heading Orientation, click Landscape, then click Ok . No need to change any of the other settings. This will make every page from this point on landscape. (figure 3)
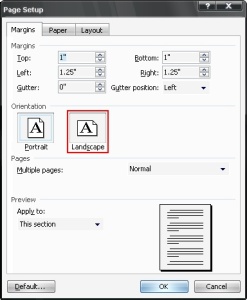
Figure 3
- To make the rest of the document portrait again, first place the cursor on the last line of the page that you want to be landscape (page 2 in this example). Click Insert -> Break on the menu. Click Section Break - Next Pageand click Ok .
- Then click File -> Page Setup on the menu. Under the heading Orientation, click Portrait, then click Ok . This will make the rest of the pages portrait, leaving the one page (page 2) landscape.
PART II: Moving the page numbers
Now that we made the page landscape, the page numbers will print along the right hand side of the paper, which won't line up with the rest of the portrait pages when printed and bound. Here's how to move the page numbers so that they line up with the rest of the document.
- Insert your page numbers like you normally would for your Word document, most likely using the Insert -> Page Numbers function from the menu.
- To edit the page numbers, click View -> Header and Footer. Put the cursor in the header of the first landscape page. Click to unselect the button labeled Link to Previous (or perhaps Same as Previous). Put the cursor in the footer of that page and remove the Link to Previous option as well. (figure 4)

Figure 4
- Now, remove the page number by clicking the text box around the number and pushing Delete (The cursor will change to a
 when over the text box. Left click when the cursor changes to select the box.)
 - While you are in the footer, click Insert -> Page Numbers and select a center alignment. The correct page number should appear in the header. (figure 5)
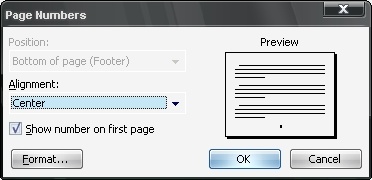
Figure 5
- Select the text box around the page number like you did in step 3 above. Right-click the frame of the text box and choose Format Frame. (figure 6)
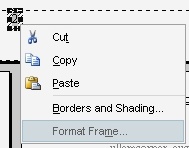
Figure 6
-
Set the indicated values to the following (figure 7):
Horizontal:
Position = 0.5" (this won't be an option, you have to enter it manually)
Relative To = Page
Vertical:
Position = Center
Relative To = Margin
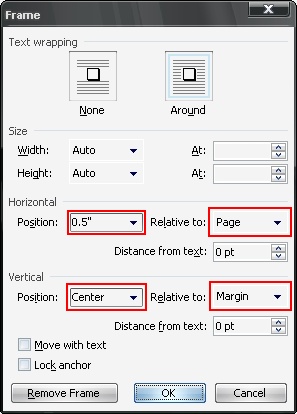
Figure 7
Click Ok to apply the changes.
- The box with the page number should now be located on the left side, in the middle of the page, except that the number is still not facing the correct direction.
- With the text box around the page number still selected, click Format -> Text Direction. Click the box on the right to orient the text so that it will match the other pages when printed. Click Ok to make the changes. (figure 8)
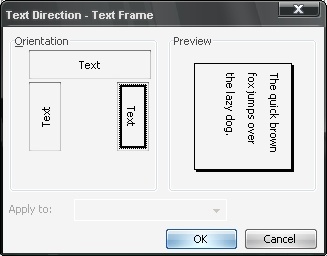
Figure 8
- You will notice that now every page from then on has the page numbers on the left side of the page, even the portrait pages. To fix this, place the cursor in the footer of the first portrait page after the landscape one. Click to unselect the button labeled Link to Previous (or perhaps Same as Previous) from the header and footer menu.
- If the page number is still on the left side of the screen, select the text box around the number and delete the box. Then, place the cursor in the footer of the first portrait page and add a page number by clicking Insert -> Page Numbers and select a center alignment. From here on, all the page numbers should be at the bottom of the page, in the center.
Any problems or questions, please email Todd Karwoski at karwoski@umd.edu.
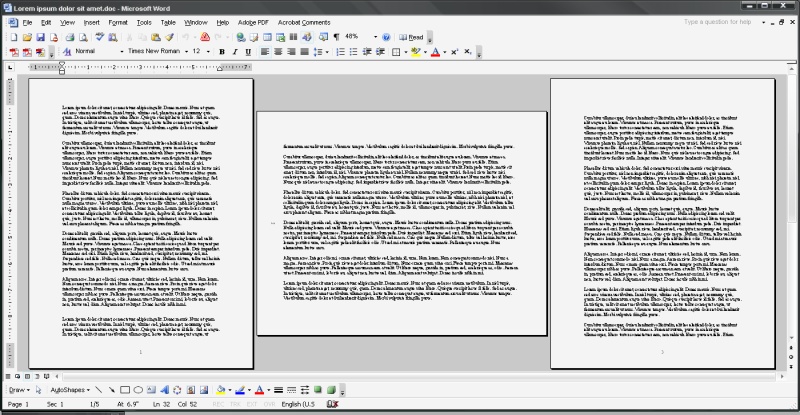
Final Result
Phone: (301) 405-4082 • Fax: (301) 314-9661 • geology@umd.edu
A member of the College of Computer, Mathematical, and Natural Sciences
Web Accessibility | Inclusivity, Diversity, and Equity Awareness: IDEA